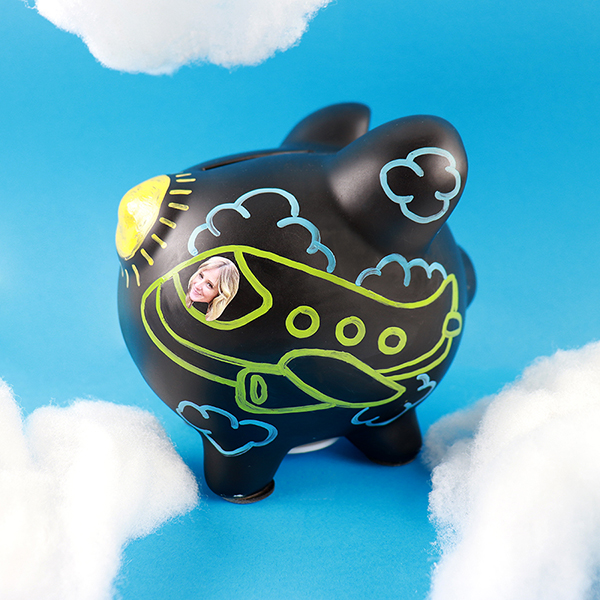
DIY Adventure Fund Piggy Bank
Posted by Lindsay on Jul 02, 2019
Sooo, we need to talk about those trips you never took.
You know, the trips that you talk about with your friends every summer, but never seem to come to fruition. That summer bucket list you come up with in May and cross off one thing by September? Yup, those ones. Don’t worry…we can relate.
It’s why we thought up this DIY! This “Adventure Fund” piggy bank is simple and fun for anyone, and will help give you that little push to save for trips, adventures, and whatever else you’re inspired to save for. Make it your own!
MATERIALS:
- Small Piggy Bank (I found mine at Michaels)
- Chalk Board Spray Paint (Black, or any color)
- Masking Tape
- Paint Markers
- Duo .75” Sticker Sheet (I made one of my BFF and myself)
HOW TO MAKE IT:
- PREP THE SURFACE FOR PAINT// I wiped my piggy bank down with some Windex and completely dried it using a microfiber cloth. A clean surface is key for a nice and smooth paint application. Once dried, I used my masking tape to tape off the little felt feet pads at the bottom of my piggy to avoid getting paint on them.
- PAINT APPLICATION// I ended up needing two coats of the chalk board paint on to my piggy. Patience is KEY here. I have a tendency to get impatient and spray as much paint on the first coat because I just want full coverage without waiting. RESIST! (See Painting Tips Below)
- BRAINSTORM// You’ll need to wait at least 24 hours for your last coat of paint to dry completely. So, I took this time to sketch out some simple ideas, and where I’d incorporate my stickers, on a piece of paper. My surface was pretty small, so I wanted to make the best of all the space before I started applying my paint markers and faces.
- TEST & SKETCH// Once your paint has completely dried, you can start applying an outline of your design to your piggy to see what fits best in size and layout. I used a pencil to map out everything without making it too noticeable on the paint. I also lightly rested the sticker faces on the surface so I can work my design around them and move them around if need be!
- GO FOR IT!// Apply your design with your paint markers. It is chalk board paint, so you can even use chalk and change up your designs whenever you want! Have fun with it!
- INSERT A DOLLAR// Get that baby started and put your first dollar in there! You are one step closer to a new adventure, an awesome trip, orrrr a cocktail on the beach :)
HELPFUL SPRAY PAINTING TIPS:
- Always work in a well ventilated area, wearing a face mask and gloves.
- Give your paint can a GOOD shaking before application.
- Do a test spray on scrap material or a piece of cardboard. Sometimes nozzles will need a spray or two to get the paint flowing without splattering unevenly. You can also test the distance you’ll want to hold your spray can before you start.
- Hold the paint can about 8” away from the object and paint in slow, sweeping motions, avoiding keeping the nozzle in one spot. It’s okay if you don’t get complete full coverage on coat 1!
- Let dry completely between coats and repeat steps for any additional coats until you get the full coverage desired.
- Allow 24 hours after final coat for your paint to completely dry.
Tag @mystickerface in your DIY piggy bank photos using your face stickers and we’ll DM you a special promo code!
Happy Stickering! :)